Help Docs
MacENCx64 Online Documentation
Routes
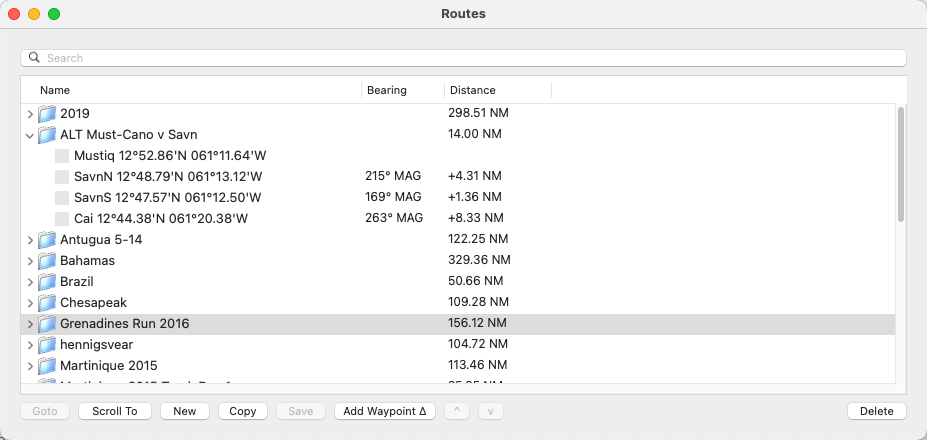
A route is a group of one or more waypoints. Routes are created by opening the Route window menu options: Routes -> Open then pressing the New button or control clicking on an open chart and selecting the New menu item on the context menu.

Once a route is created use the Add Waypoint ^ button to add one to a route. There are a number of ways to add Waypoints to a route beyond the dialog. (See preferences overview for details on default add Waypoint to Route). Ways to add:
-
While in map drag mode
 control click mouse on desired location and see New, then Waypoint in Route.
 -
While in Waypoint move mode
 . Double click on chart to create and add the waypoint to the selected route. See preferences overview for details on default add
Waypoint to Route.
 -
Waypoints can also be dragged from the Waypoints window to a Route in the Route window. A route can be dragged into a destination route which will add the route waypoints to the destination route.
The name of the route can be edited by single clicking to select the route, then single clicking the name in the Route window. The waypoints of a route can be edited by double-clicking on them in the Route window. The order of the waypoints in the route can be changed with the ^ and v buttons or by dragging. An entire route can be deleted or individual route waypoints can be deleted with the Delete button. The selected route can also be inverted, that is the order of the waypoints reversed with the menu item ** Routes -> Invert. The selected route can be duplicated by pressing the Copy button. The menu item **Routes -> New From Track will create a route that follows the current selected track. (see tracks)
The Add To Route... on the Chart context menu ( control click) will work with the selected annotation. When an annotation is selected by selecting the annotation mode in the toolbar and moving the cursor over the desired annotation, waypoints that follow the selected annotation are created an added to the selected route.
The selected route can be shown on the chart with the menu item Routes -> Show Selected. In the Route window, displayed next to the route name is the total distance of the route. Displayed next to the waypoint name is the distance and bearing from the previous waypoint. Clicking on the Distance column header in the Routes window will toggle display between segment distance and cumulative distance.
If the GPS panel is opened (via menu item GPS -> Connect) and a current position is transmitted from the connected GPS, you can navigate to a route or individual waypoint by selecting it and pressing the Goto button. This makes the waypoint and route active. The Goto button will become a Next button and can be used to advance to the next waypoint in the route. The Routes -> Auto Next menu item can be enabled to automatically advance to the next waypoint of the route when the position is within Waypoint Approach Distance of the active waypoint OR the GPS position crosses the line perpendicular to the waypoint origin line which passes through the waypoint. Details of the active waypoint and route can be seen in the Navigation panel. An active route can be canceled by selecting Cancel Goto on the Navigation panel.
Scroll To** button will scroll the chart to the selected waypoint.
A route is also created and listed in the Route window if the GPS is navigating to one and the Goto check box is selected in the GPS panel. Also the waypoints of the active route are created and listed in the Waypoint window. When this occurs the GPS waypoint from the route will take precedence over any other waypoint.
Routes can be imported and exported to a file via the Routes -> Transfer sub menu. For importing, the route waypoints CSV file must be in the following format:
name,latitude,longitude,description <newline>
name,latitude,longitude,description <newline>
[latitude] and [longitude] must be in the same format as the selected Position Format in preferences.
Import and export support CSV file, a GPX ![]() file or a Google Earth Versions
file or a Google Earth Versions ![]() KML or KMZ file. Routes can be saved to cloud storage (such as iCloud or Dropbox) and shared with other applications including the popular mobile application iNavX.
KML or KMZ file. Routes can be saved to cloud storage (such as iCloud or Dropbox) and shared with other applications including the popular mobile application iNavX.
Selected Routes can be copied to and from the GPS via Waypoints -> Transfer -> To/From GPS. Currently Garmin, Magellan, Furuno and Other protocols are supported of directly connected (increasingly uncommon setup). Before the transfer begins the GPS panel will automatically be closed. Make sure the correct brand of GPS is selected in the GPS Settings drawer. Garmin GPS will need to be put in Data Transfer/Slave or 'GARMIN' Mode before a waypoint transfer can be performed.
Other GPS must support the $GPWPL NMEA 0183 message. Since GPS's don't support long unrestricted waypoint names or descriptions they will be reformatted and truncated when being transferred.
Sadly, no manufacturer has implemented NMEA 2000 waypoint / route transfer.